
This post is in partnership with Command™ Brand. Command™ brings to life your décor, your way in a project that is unique just like you.
I've been wanting to hang art gallery-style utilizing the corner of our dining room area for quite a while, so when the folks at Command™ challenged us to take a DIY project and inject some of our personal flare around it, I was inspired! I've been inspired by big, graphic prints lately, inspired by mid-century interiors where big, bold designs were all the rage. And if you're going to go bold, black and white will work in any interior, whether you're just starting out or already have an established look. Graphics especially feel very cosmopolitan and can be placed in an entrance way to a statement wall in the living room. Go big or go home!
We have this big empty space surrounding the dining room table, where there really is no room for furniture, so to make it feel more homey I thought a gallery wall would be the perfect solution. I also wanted to add a bit of colour to the space since all of the walls, floor (and table) in that room are white. It ended up I needed a few more pieces of art to fill it up though, so I created a few printables that I sent to our local printer to print onto canvas. I was quite impressed with how they turned out, so I thought I'd share the printables with you too and and at the same time show you how I like to hang art gallery-style (fearlessly, I might add), with the help of Command™ Picture Hanging Strips!

I've been using their Picture Hanging Strips for various projects for the past few years, and they are hands-down my favourite way to hang art. You don't have to be worried about changing your mind on placement of your frames, as you can tear down and reposition them without damaging your walls. I also like that I don't need to have any tools to hang pictures if I don't have any. Here's how we hang our art:
DIY Free Printable Art Gallery Style
Before starting any project using Command™ Picture Hanging Strips, please follow package instructions to ensure a strong hold and no damage to your walls. Please visit here to learn how to remove all Command™ Brand products.
You will need:
Choice of free printables
12" x 12" Printable Print (View and download PDF here)
26" x 26" Printable Print (View and download PDF here)
Wooden frames for canvas
12" x 12"
26" x 26"
Staple gun
Mallet
Command™ Brand Strips (we used the 12lb package with 6 medium pairs)

Step 1
Take (or email) your printable print file to your local printers that can print on canvas. If you just want to print on paper - this is possible too. The printer can also adjust the size if you want to go smaller. There are two sizes I made for the canvas:
Bauhuas Style Print
12" x 12"
One of the most influential movements in modern design, a Bauhaus-inspired graphic pattern fits comfortably into so many different types of spaces. 12" x 12" Printable Print (View and download PDF here)


Abstract Expressionism
26" x 26"
Inspired by the work of American painter, Franz Kline, this version is more organic and painterly. Strokes applied and layered in a way that looks effortless, yet intended. 26" x 26" Printable Print (View and download PDF here).

Once you have your prints ready, pick up wooden frame sets from your local art store. I created standard sizes so this would be easy. If you want a more budget friendly option, choose the stretch canvas frames that you put together using a mallet like we did. Not to be discouraged, they're fairly simple to put together. Simply place each piece in it's allotted slots, and mallet together (as shown).


Step 3
Once you have created your frame, then you can start to stretch the canvas onto the frame. First measure, then staple. Then trim the edges using a scissors or cutting knife.


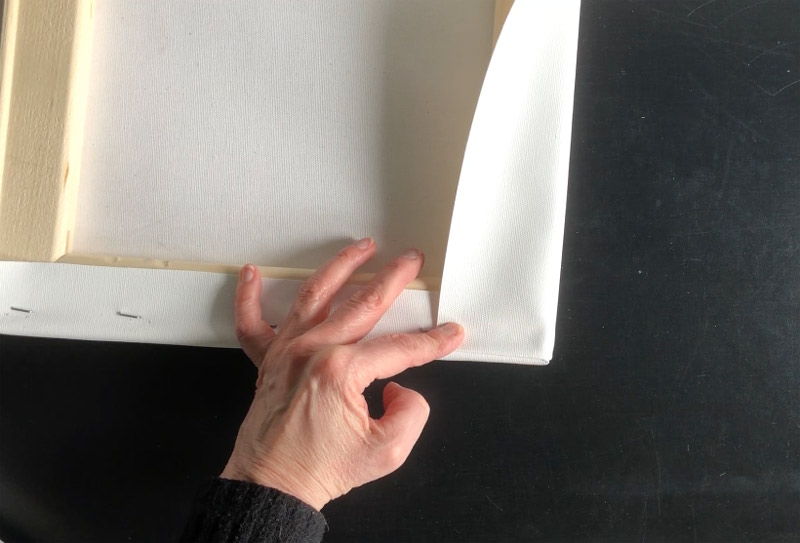
Step 4
To fold over a nice edge, cut as shown in each corner. Then fold and staple.


Step 5
Then adhere the Command™ Picture Hanging Strips on. Make sure to follow package instructions to ensure a strong hold and no damage to your walls. Note: we have cut the canvas so that the strips on attached to the wood and not the canvas.

Step 6
Now you can start to arrange your art. For this wall we decided to place the art in unevenly, but you'll notice there is still balance amongst everything. For example, smaller sizes are offset from each other, so there is variety, and interest but at the same time your eye flows easily as you look from one piece to another.
We like to lay things out on the floor to begin. Then once that is decided, it's time to start to hang your art. Since we were hanging art in a corner, we started in the corner and worked our way out.

Step 7
To create an even display, use something to measure with. If you are alone, having a level is really helpful to ensure things are straight. Pro-tip: We also used the level to measure in between (vertically) each piece as a guide.

Step 8
Measure the distance between each Command™ Picture Hanging Strips on the back of the piece of art. Apply the Command™ Picture Hanging Strips to the wall. As mentioned earlier, you don't have to be worried about changing your mind on placement of your frames, as you can tear down and reposition them without damaging your walls.

Step 9
Hang your piece of art, and repeat with each piece!


Comments