
Hi all! Chelsea here from Lovely Indeed, happy to be joining the amazing DIY squad at Poppytalk! I'm a big fan of recycling and repurposing, so I decided to get to work on some cardboard boxes I had laying around the house. As it turns out, cardboard makes a pretty sweet little pendant light.
First, gather your materials.

- Corrugated cardboard, 25" wide and as tall as you'd like your light
- Spray paint
- Yard stick
- Box cutter
- Glue gun
- Pendant light cord (this one from Ikea is only $5!)
Step 1: Start by spray painting one side of the cardboard. Let it dry thoroughly and turn the cardboard painted side down.
Step
2: Mark the cardboard at 5-inch intervals lengthwise with the box
cutter. On each mark, make a vertical cut with the box cutter so that
the top side of the cardboard is cut but the bottom side remains intact.

Step 3: Lay the cardboard flat again and cut it into strips lengthwise by tracing along the yard stick with the box cutter.

Step
4: Once your strips are cut, hot glue the ends of each strip together
(painted side in) so that you have pentagons. Then begin making a
staggered stack with the pentagons and securing them in place with hot
glue.

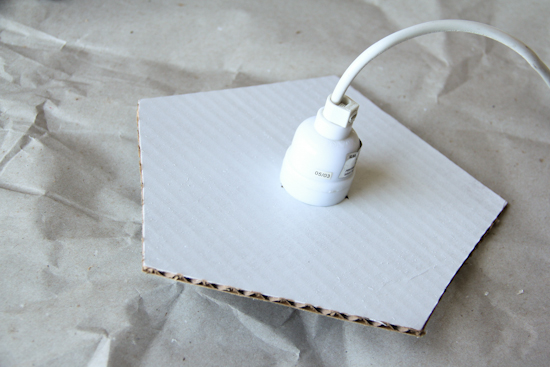
Step
5: Finally, cut a solid pentagon out of cardboard for the top of the
pendant. Cut a hole in the top just wide enough to fit the light socket
snugly. Secure this to the top of the pendant with hot glue, and light
it up!

Not
sure yet where this little guy is going to live in my house, but I have
a feeling he'll brighten the perfect corner. Have fun!


Contributor Post by Chelsea of Lovely Indeed
Follow Chelsea at Lovely Indeed, Twitter, Facebook and Pinterest!
Follow Chelsea at Lovely Indeed, Twitter, Facebook and Pinterest!
Comments
Katlyn
www.thedreamymeadow.com
What a beautiful Light...^^
Regards,
www.accdiy.com
What a beautiful Light...^^
Thanks for the idea!
Cardboard is one of my favorite materials. Nicely done!
xo Sam
DIYhuntress.com
facebook.com/DIYhuntress
http://www.lazyinvstor.com/2013/10/diy-lamp-unapologeticallly-cardboard.html
We have referenced your blog :)
Personally, I'm doing this twice for a pair of lamps that I currently DETEST! Been looking for a cheap way to change them for forever!