
Contributor post by Emily + Erick of Hello Home Shoppe

Recently, between prop hunting and cleaning out our "prop closet" (aka a hoarders trove of cooking wares), we've re-discovered some of our favorite gems that we've collected over the years. Since it seemed like a shame to keep them in a closet where they wouldn't see the light of day, we decided to display them in our room. The only problem? Seemingly ever square inch of surface real estate was taken with books, plants, and other items we collected--clutter abound! We realized it was time to more thoughtfully display our items and create visual structure. We'd been admiring vintage glass display cases for some time, but they can be pricey so we dreamt up our own version. Read below for how to create your own!
Things To Gather:
Newsprint or paper to cover workspace
4, 8"x10" frames from the dollar store, glass frames removed.
Paintbrush you don't mind sacrificing
Epoxy
Heavy objects to hold glass in place as it dries
Razor blade
Rubbing alcohol (optional)
Copper metal leaf
Metal leaf adhesive

Directions:
1. First, we are going to glue our box together with the epoxy. Cover your workspace in newsprint or paper to protect it. Before glueing, you will want to play around with the four glass panes to make sure you know which side to glue to which. Using your paintbrush, paint a thin line of epoxy along one edge of the box. Don't worry if your epoxy runs--we will clean up later.

2. Press edge with epoxy into the other edge, forming a flush 90 degree angle. Hold firmly in place for a few minutes.

3. Repeat steps 1 and 2 for second glass piece. Prop up glass sides with your heavy object to hold them in place as they dry. Glue last piece of glass on both edges to attach to box and let the entire box dry for about an hour. Finished box will have no front pane or back pane, to allow you to place items in box.

4. Once your epoxy is dry, clean up any dots of epoxy than may have run with a razor. Dissolve any glue smudges with gentle dabs of rubbing alcohol.

5. Now, it's time to paint on your copper metal leafing! Apply your gold leaf adhesive (available at craft stores) to the four front edges of your box.

6. Carefully transfer gold leaf to tacky edges of box.

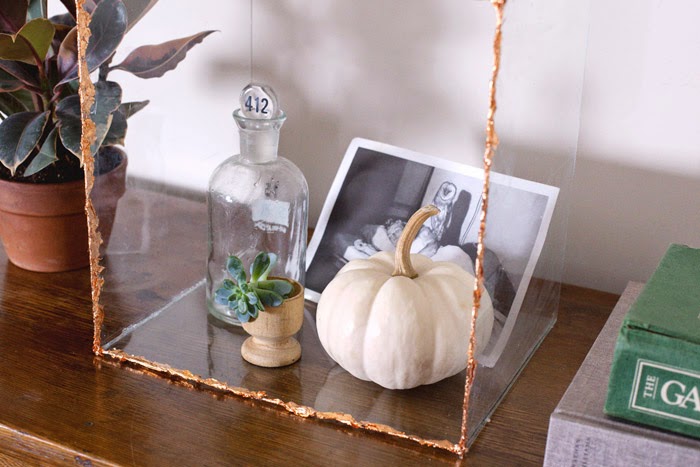
7. Using the inverted point of a paintbrush, press down the gold leaf to create a rough edge. This should look smooth, but also have an organic feel to it. Let dry for 30 minutes, flip over and you're ready to display!

 Meet the Contributors
Recently, between prop hunting and cleaning out our "prop closet" (aka a hoarders trove of cooking wares), we've re-discovered some of our favorite gems that we've collected over the years. Since it seemed like a shame to keep them in a closet where they wouldn't see the light of day, we decided to display them in our room. The only problem? Seemingly ever square inch of surface real estate was taken with books, plants, and other items we collected--clutter abound! We realized it was time to more thoughtfully display our items and create visual structure. We'd been admiring vintage glass display cases for some time, but they can be pricey so we dreamt up our own version. Read below for how to create your own!
Things To Gather:
Newsprint or paper to cover workspace
4, 8"x10" frames from the dollar store, glass frames removed.
Paintbrush you don't mind sacrificing
Epoxy
Heavy objects to hold glass in place as it dries
Razor blade
Rubbing alcohol (optional)
Copper metal leaf
Metal leaf adhesive
Directions:
1. First, we are going to glue our box together with the epoxy. Cover your workspace in newsprint or paper to protect it. Before glueing, you will want to play around with the four glass panes to make sure you know which side to glue to which. Using your paintbrush, paint a thin line of epoxy along one edge of the box. Don't worry if your epoxy runs--we will clean up later.
2. Press edge with epoxy into the other edge, forming a flush 90 degree angle. Hold firmly in place for a few minutes.
3. Repeat steps 1 and 2 for second glass piece. Prop up glass sides with your heavy object to hold them in place as they dry. Glue last piece of glass on both edges to attach to box and let the entire box dry for about an hour. Finished box will have no front pane or back pane, to allow you to place items in box.
4. Once your epoxy is dry, clean up any dots of epoxy than may have run with a razor. Dissolve any glue smudges with gentle dabs of rubbing alcohol.
5. Now, it's time to paint on your copper metal leafing! Apply your gold leaf adhesive (available at craft stores) to the four front edges of your box.
6. Carefully transfer gold leaf to tacky edges of box.
7. Using the inverted point of a paintbrush, press down the gold leaf to create a rough edge. This should look smooth, but also have an organic feel to it. Let dry for 30 minutes, flip over and you're ready to display!
Meet the Contributors
Emily Hirsch and Erick Steinberg are blogging duo behind Hello Home Shoppe, a lifestyle blog with a focus on DIY projects, recipes, and travel. When they're not blogging or working as 2/4 of the creative agency Jolly Bureau, they moonlight as locally sourced sandwich vendors in Philadelphia, PA.


1 comment:
This is beautiful! And very creative! I just keep looking at these pictures because the copper looks like it's floating!
Post a Comment